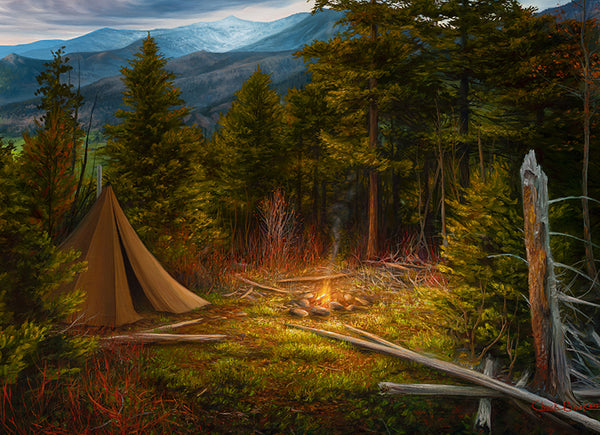
Painting fire is not as tricky as one might think. Whenever I approach something like a campfire or source of light, I think of it as I would any part of the painting. At the end of the day, it's all about how you arrange the colors that dictates how something is perceived. In this post I'm going to show you how I paint a realistic campfire such as this one below from my most recent oil on canvas.

Note: This blog contains affiliate links and purchasing through them supports our site at no extra cost to you.
After blocking in the area around the fire, I add pure Cadmium Orange where I think the coals will be. The bright oranges at the base of fires should be one of the colors that really pop out at the viewer and so by adding this first it ensures no other colors will be mixed in with it, maintaining its luminosity.


After the yellow is down, I mix some white in the brightest of those areas of yellow. This is where I begin to add a little bit thicker paint so that it covers rather than blends into what's beneath.
I break up the flames with a deep red or brown to give the indication of some logs. Some of the work I just did might get covered up by this and that is fine. I work wet in wet through this whole process, so everything is changeable as I go.


Once that area looks good, I think about the details around the fire. In this case, some of the rocks and boulders and some of the shadows and details around the fire itself.

I try to lighten any details as they get closer to the fire itself. Notice some of the pure white disappeared as I worked through the fire. The flames eventually got too thick/wet for me to keep working on them, so I opted to let the whole thing dry a couple of days before re-adding the pure whites back in.
So this next picture was from after it had dried..

Now for the smoke, I make sure the background is dry and add a little bit of warm gray color to my brush and lightly swirl on some indications of smoke.

Then I pick up a round blender brush to fan it out and create the illusion of smoke. When doing this I make sure that the blender brush is dry as I want to blend out the color rather than push it around.

The finished results produce a beautiful light source for this painting.
